智一面的面试题提供python的测试题
使用地址:http://www.gtalent.cn/exam/interview?token=906315a76b5c14231889351088713f76
运行代码如下:
# -*- coding: utf-8 -*-
from PyQt5.QtCore import *
from PyQt5.QtGui import *
from PyQt5 import QtWidgets
from PyQt5.QtWidgets import *
import cv2 as cv
import numpy as np
import os
class MainWindow(QMainWindow, Ui_MainWindow):
"""
Class documentation goes here.
"""
def __init__(self, parent=None):
"""
Constructor
@param parent reference to the parent widget
@type QWidget
"""
super(MainWindow, self).__init__(parent)
self.setupUi(self)
self.color = [0, 0, 0]
self.target =True
self.i=0
self.newname =''
self.file_name=""
self.file_type =""
@pyqtSlot()
def on_loadImage_clicked(self):
"""
Slot documentation goes here.
"""
# TODO: not implemented yet
self.file_name, self.file_type = QFileDialog.getOpenFileName(self,"打开文件","D:/","All Files (*);")
if (img.shape[2] == 3):#bgr到rgb转换的显示
qimg = cv.cvtColor(img, cv.COLOR_BGR2RGB)
qimg = QImage(qimg.data, qimg.shape[1], qimg.shape[0], qimg.shape[1]*qimg.shape[2],QImage.Format_RGB888)
self.before.setPixmap(QPixmap.fromImage(qimg))
else:
qimg = QImage(img.data, img.shape[1], img.shape[0],QImage.Format_Grayscale8)
self.before.setPixmap(QPixmap.fromImage(qimg))
@pyqtSlot(str)
def on_colorchoose_currentIndexChanged(self, p0):
"""
Slot documentation goes here.
@param p0 DESCRIPTION
@type str
"""
# TODO: not implemented yet
current = self.colorchoose.currentText()
if self.target:
if current=="红色":
self.color =[0, 0, 255]
self.newname= '_red'
elif current=="白色":
self.color =[255, 255, 255]
self.newname= '_white'
elif current=="蓝色":
self.color =[255, 0, 0]
self.newname= '_blue'
elif current=="绿色":
self.color =[0, 255, 0]
self.newname= '_green'
elif current=="黄色":
self.color=[0, 255, 255]
self.newname= '_yellow'
elif current=="紫色":
self.color=[255, 0, 255]
self.newname= '_violet'
elif current=="灰色":
self.color=[96, 96, 96]
self.newname= '_gray'
@pyqtSlot()
def on_change_clicked(self):
"""
Slot documentation goes here.
"""
# TODO: not implemented yet
if self.red.text()!="":
self.newname='_define'
print(self.color)
self.target = False
img =cv.imread(self.file_name, -1)
if (img is None):
print(1)
self.textBrowser.setText("打开图片失败,请重新加载")
else:
# 准备数据
wide = img.shape[1]
height = img.shape[0]
dims = img.shape[2]
sampleCount = wide * height
clusterCount = 4
points = np.zeros([sampleCount, dims], np.float32)
centers = np.zeros([clusterCount, 1], np.float32)
index = 0
for i in range(height):
for j in range(wide):
index = i * wide + j
for n in range(dims):
points[index][n] = img[i][j][n]
criteria = (cv.TERM_CRITERIA_EPS + cv.TERM_CRITERIA_MAX_ITER, 10, 0.1)
ret, label, center = cv.kmeans(points, clusterCount, None, criteria, 10, cv.KMEANS_PP_CENTERS)
mask = np.zeros((img.shape[0], img.shape[1]), np.uint8)
index = wide * 2 + 4
img2 = img.copy()
cindex = label[index]
for i in range(height):
for j in range(wide):
index = i * wide + j
label1 = label[index]
if cindex == label1:
for n in range(dims):
img2[i][j][n] = 0;
mask[i][j] = 0;
else:
mask[i][j] = 255
structuting = cv.getStructuringElement(cv.MORPH_RECT, (13, 13))
mask =cv.dilate(mask,structuting)
mask = cv.erode(mask, structuting)
structuting2 = cv.getStructuringElement(cv.MORPH_RECT, (9, 9))
mask = cv.erode(mask, structuting2)
cv.waitKey(10)
mask = cv.GaussianBlur(mask, (9, 9), 0, 0)
for i in range(height):
for j in range(wide):
if mask[i][j] == 0:
for n in range(dims):
img2[i][j][n] = self.color[n]
else:
continue
img2 = cv.GaussianBlur(img2, (3, 3), 0, 0)
if (img2.shape[2] == 3):
qimg = cv.cvtColor(img2, cv.COLOR_BGR2RGB)
qimg = QImage(qimg.data, qimg.shape[1], qimg.shape[0], qimg.shape[1] * qimg.shape[2],
QImage.Format_RGB888)
self.after.setPixmap(QPixmap.fromImage(qimg))
else:
qimg = QImage(img.data, img.shape[1], img.shape[0], QImage.Format_Grayscale8)
self.after.setPixmap(QPixmap.fromImage(qimg))
name=fathername+"/"+name+self.newname+type
print(name)
cv.imwrite(name,img2)
write = "the image has been saved in:"+name
self.textBrowser.setText(write)
if __name__ == "__main__":
import sys
app = QtWidgets.QApplication(sys.argv)
ui = MainWindow()
ui.show()
sys.exit(app.exec_())
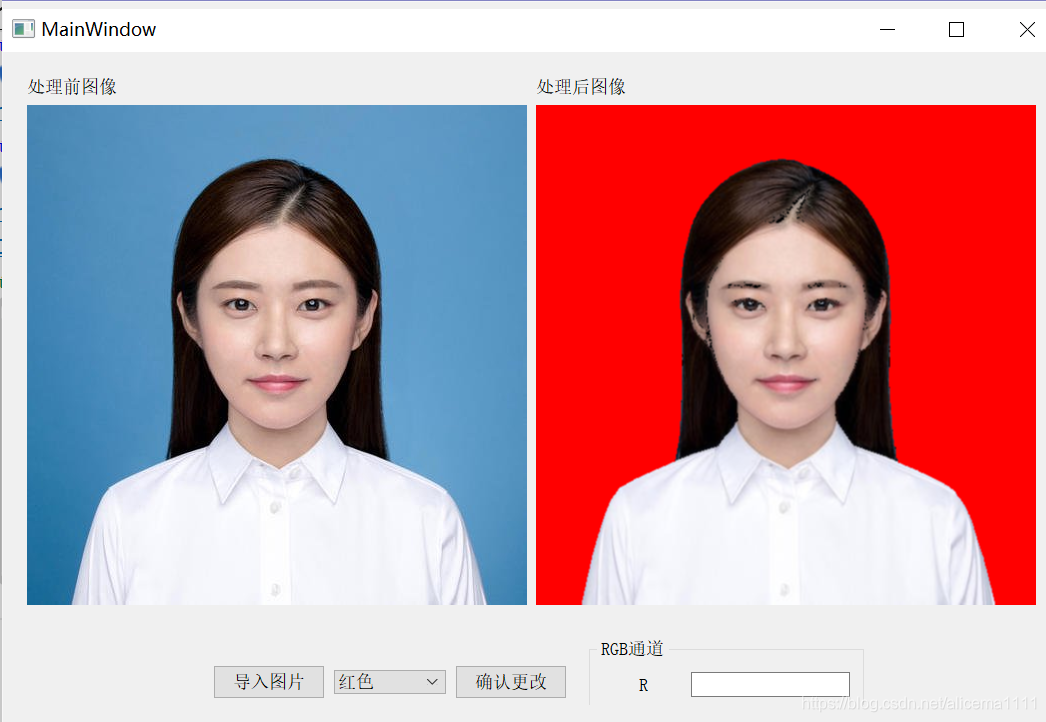
运行结果:

————————————————
我们的python技术交流群:941108876
智一面的面试题提供python的测试题
使用地址“http://www.gtalent.cn/exam/interview?token=8a33fabdc405d59c90ffca2496195543

