高级运维工程师在线评测:http://www.gtalent.cn/exam/interview/nsYteJ5wFfWkMdb2
Ansible playbook
一、playbook 任务标签
1.标签的作用
默认情况下,Ansible在执行一个playbook时,会执行playbook中定义的所有任务,Ansible的标签(tag)功能可以给单独任务甚至整个playbook打上标签,然后利用这些标签来指定要运行playbook中的个别任务,或不执行指定的任务。
2.打标签的方式
1.对一个task打一个标签
2.对一个task打多个标签
3.对多个task打一个标签
3.对一个task打一个标签
- hosts: nginx
    - name: Config Nginx Server
      copy:
        src: /etc/nginx/nginx.conf
        dest: /etc/nginx/
      notify: restart_nginx
      tags: reconf_nginx
4.对多个task打一个标签
[root@m01 ~]# cat nginx.yml
···
- hosts: web_group
    - name: Config Nginx Server
      copy:
        src: /etc/nginx/nginx.conf
        dest: /etc/nginx/
      notify: restart_nginx
      tags: reconf_nginx

    - name: Config Nginx wordpress
      copy:
        src: /~/mm/linux12.wp.com.conf
        dest: /etc/nginx/conf.d/
      notify: reload_nginx
      when: (ansible_fqdn == "web01") or (ansible_fqdn == "web02")
      tags: reconf_nginx
      ···
5.对一个task打多个标签
[root@m01 ~]# cat nginx.yml
···
- hosts: nfs
    - name: Config Nginx Server
      copy:
        src: /etc/nginx/nginx.conf
        dest: /etc/nginx/
      notify: restart_nginx
      tags:
      	- reconf_nginx
      	- reconfig_nginx
      	···
6.标签使用方式
# 1、查看标签 (所有标签)
[root@m01 ~]# ansible-playbook lnmp1.yml --list-tags

playbook: wp.yml

  play #1 (nginx): nginx	TAGS: []
      TASK TAGS: [reconf_nginx, reconfig_nginx]

# 2、执行指定标签的内容
[root@m01 ~]# ansible-playbook lnmp1.yml -t reconfig_nginx

# 3、执行多个标签代表的内容
[root@m01 ~]# ansible-playbook lnmp1.yml -t reconf_nginx,reconfig_nginx

# 4、不执行指定标签的内容
[root@m01 ~]# ansible-playbook lnmp1.yml --skip-tags reconfig_nginx
二、playbook 复用
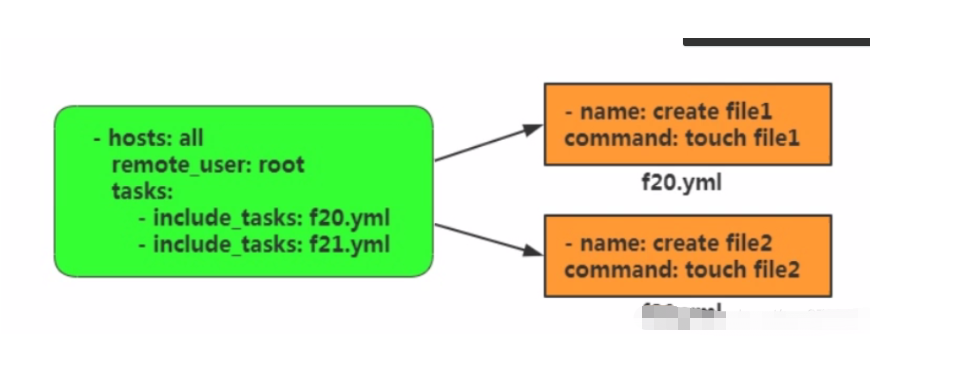
在之前写playbook的过程中,我们发现,写多个playbook没有办法,一键执行,这样我们还要单个playbook挨个去执行,很笨。所以在playbook中有一个功能,叫做include用来动态调用task任务列表。

# 0.编写脚本使用(笨办法)
[root@m01 ~]# cat lnmp.sh
#! /bin/bash
ansible-playbook lnmp.yml  &&\
ansible-playbook lnmp1.yml &&\
ansible-playbook lnmp2.yml &&\
ansible-playbook lnmp3.yml &&\
ansible-playbook lnmp4.yml &&\
ansible-playbook lnmp5.yml

1.NFS机器上安装nginx --原来的方法 (单复用)
# 1.创建目录
[root@m01 ~ ]# mkdir nginx
# 2.编写安装nginx.yml文件
[root@m01 nginx]# cat nginx.yml
- hosts: nfs_group
  tasks:
    - name: install nginx server
      yum:
        name: nginx
        state: present
# 3.编写启动start.yml文件
[root@m01 nginx]# cat start.yml
- hosts: nfs_group
  tasks:
    - name: start nginx server
      systemd:
        name: nginx
        state: started
        enabled: yes
# 4.验证并查看nginx.yml文件
[root@m01 nginx]# ll
total 8
-rw-r--r-- 1 root root 115 May  8 11:59 nginx.yml
-rw-r--r-- 1 root root 161 May  7 12:05 start.yml
[root@m01 nginx]# ansible-playbook --syntax-check nginx.yml

playbook: nginx.yml
[root@m01 nginx]# ansible-playbook --syntax-check start.yml

playbook: start.yml
# 5.运行nginx.yml文件
[root@m01 nginx]# ansible-playbook nginx.yml
[root@m01 nginx]# ansible-playbook start.yml
2.playbook复用的配置
# 1、编辑两个剧本
[root@m01 nginx]# cat nginx.yml
    - name: install nginx server
      yum:
        name: nginx
        state: present

[root@m01 nginx]# cat statr.yml
    - name: start nginx server
      systemd:
        name: nginx
        state: started
        enabled: yes

# 2、编写复用剧本的文件
[root@m01 ~]# vim main.yml
- hosts: nfs_group
  tasks:
    - include_tasks: /root/nginx/nginx.yml
    - include_tasks: /root/nginx/stare.yml

 # 剧本复用:
    就是上面的剧本从name开始,下面直接调用即可,单独使用就不允许。
3.直接复用写好的palybook文件
[root@m01 ~]# cat main.yml
- import_playbook: ./lnmp.yml
- import_playbook: ./lnmp1.yml
- import_playbook: ./lnmp2.yml
- import_playbook: ./lnmp3.yml
- import_playbook: ./lnmp4.yml
- import_playbook: ./lnmp5.yml
三、playbook忽略错误
1.简介
默认playbook会检测task执行的返回状态,如果遇到错误则会立即终止playbook的后续task执行,然鹅有些时候playbook即使执行错误了也要让其继续执行

# 加入参数: ignore_errors: yes
2.配置文件
[root@m01 ~]# cat main.yml
...
- hosts: nfs_group
  tasks:
    - name: Check Httpd Server
      #使用命令检查服务启动状态时,如果服务没有启动则会得到错误结果,剧本会停止运行
      command: systemctl is-active httpd
      #配置忽略错误可以继续执行剧本
      ignore_errors: yes
      register: check_httpd

    - name: debug outprint
      debug:
        msg: "{{ check_httpd }}"

    - name: Httpd Restart
      service:
        name: httpd
        state: restarted
      when: check_httpd.rc == 0
      ...
四、错误处理
如上所述,当task执行失败时,playbook将不再继续执行,包括如果在task中设置了handler也不会被执行。
但是我们可以采取强制措施...
1.强制调用handlers
[root@m01 ~]# cat handler.yml
- hosts: web_group
  vars:
    - http_port: 8012
  force_handlers: yes
  tasks:
    - name: config httpd server
      template:
        src: ./httpd.j2
        dest: /etc/httpd/conf
      notify:
        - Restart Httpd Server
        - Restart PHP Server

    - name: Install Http Server
      yum:
        name: htttpd
        state: present

    - name: start httpd server
      service:
        name:httpd
        state: started
        enabled: yes

  handlers:
    - name: Restart Httpd Server
      systemd:
        name: httpd
        state: restarted

    - name: Restart PHP Server
      systemd:
        name: php-fpm
        state: restarted
2.抑制changed
被管理主机没有发生变化,可以使用参数将change状态改为ok
    - name: Check php Install Status
      shell: "rpm -qa | grep php | wc -l"
      register: get_php_instll_status
      changed_when: false
【王老师说运维】:运维之linux基础入门实战

